|
Manual
|
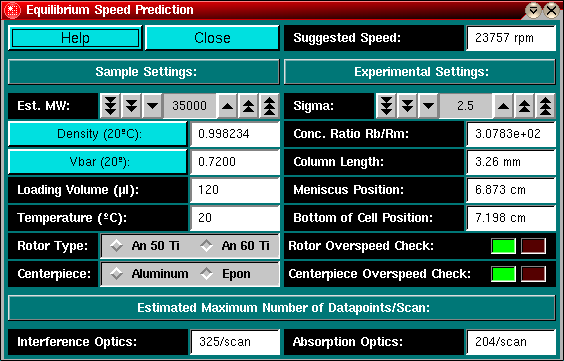
Estimating Equilibrium Speed:

In order to determine the best speed for an equilibrium experiment,
select "Suggest Best Speed" from the Equilibrium
menu in the main window. start You can start the
Explanation for fields and buttons:
-
Help: Bring up this Help window
-
Close: Close the equilibrium estimation module and return to the
main window.
-
Density (20 C): Call the buffer calculation
module. This will calculate the density correction for the buffer you
selected and correct the density for the selected temperature. You can
also override the calculation routine and enter an known density for your
buffer at 20C.
-
Vbar (20 C): Call the vbar calculation module.
This will calculate the vbar for a protein sequence from the Swiss Protein
Database. You can also override this value by providing your own vbar value.
The program will automatically adjust your value to the selected temperature.
-
Suggested Speed: This is the best speed for the selected settings.
Use this speed for your experiment.
-
Est. MW: Enter here the estimated molecular weight for the sample.
If there are more than component in this sample, use a weight average molecular
weight. For monomer-dimer equilibria, use the molecular weight of the monomer.
-
Sigma: Enter the reduced molecular weight sigma. This value should
ideally be between 2 and 3. If you plan to perform an experiment with 3
speeds, select one speed for a sigma value of 2.0, one for 2.5 and one
for 3.0. This value will adjust the curvature of the final equilibrium
gradient. If this number is too small, the gradient will be too shallow,
and the information content of the experiment is minimal.
-
Concentration Ratio Rb/Rm: This is the ratio of the concentration
(fringes or OD) at the bottom of the cell over the concentration at the
meniscus that will be observed at equilibrium. The larger the loading volume,
the larger will this ratio be. This ratio is directly related to the sigma
value for the run.
-
Column length. The program will calculate the length of the column
(in mm) according to the rotor stretching and loaded volume.
-
Loading volume: Enter the amount of sample to be loaded.
-
Meniscus position: This value is provided to allow you to adjust
the scanning positions of the XL-A. For short column experiments it is
often not necessary to scan the entire cell. This value will tell you in
advance where the meniscus will be. It is a good idea to always set the
scanning range a few millimeters longer than given by this value, in case
of pipetting error.
-
Temperature: Enter the temperature of the run.
-
Bottom of Cell Position: This program will calculate the bottom
of the cell based on the rotor stretching and the centerpiece used.
-
Rotor Type: Click on the button corresponding to the rotor to be
used in the experiment
-
Rotor Overspeed Check: If your settings bring the rotor speed above
the permitted speed of the selected rotor, a red LCD will flash to warn
you about the rotor selection.
-
Centerpiece: Select the appropriate centerpiece.
-
Centerpiece Overspeed Check: If your settings bring the rotor speed
above the permitted speed of the selected centerpiece, a red LCD will flash
to warn you about the rotor selection.
-
Estimated Number of Datapoints/Scan: This field will show you how
many datapoints you can expect for the a particular optical system for
the settings selected. This number is only an estimate and will depend
in large part on the amount of useful data in your scans. For the absorbance
optical system, it also requires that you use the maximum resolution setting
of the XL-A, which is 0.001 cm/datapoint. However, because of the data
acquisition system, datapoints will generally only be acquired at a density
of about 0.0016 cm/points on the average.
www contact: Borries Demeler
This document is part of the UltraScan Software Documentation
distribution.
Copyright © notice.
The latest version of this document can always be found at:
http://www.ultrascan.uthscsa.edu
Last modified on January 12, 2003.


