
|
Manual |
| Part 5: Parameter Controls | Previous: Scan Editing | Next: Fitting Information |
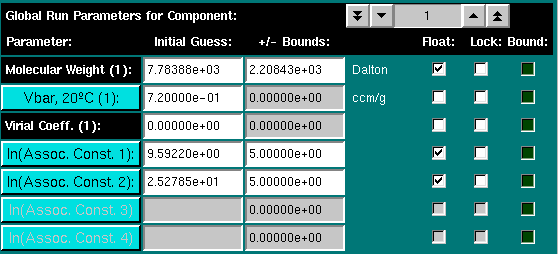
After selecting a model and running the scan diagnostics, you can initialize the parameters for the model by clicking on the "Initialize Parameters" button, which now is activated. This function will apply a first order fit to the data and using a line search algorithm identify a good starting guess for the molecular weight and the amplitudes. Baselines are set to zero, and association constants are set to a small number. Initial estimates for each parameter for each included scan will be assigned automatically, and the Model Control Window will appear. Each parameter that can be floated will be listed with a "Float" checkbox. If checked, the parameter will be adjusted by the nonlinear least squares fitting routine, otherwise, it will be held constant. By default, none of the floatable parameters are set to be floated, until the "Float Parameters" button is clicked. For constrained fitting, the "Lock" checkbox needs to be checked, and the parameter will only be adjusted within the bounds listed. If the fitting routine attempts to adjust the parameter outside the bounds, the bound LED will flash red, otherwise it will be lit up in green. If constrained fitting is not used, the LED will be turned off. (Note: constrained fitting has not been implemented at this time and is not available yet).
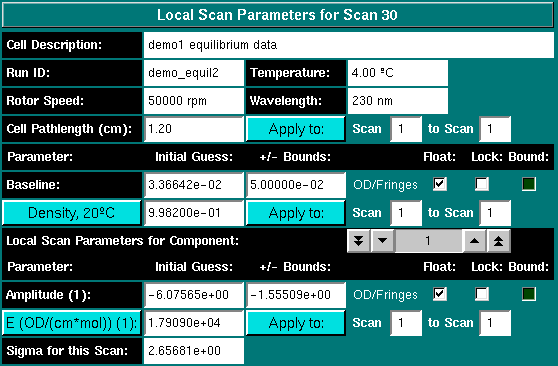
The model control distinguishes between global and local parameters, as well as static scan parameters which were experimentally determined, such as rotor speed, path length, temperature, buffer density, extinction coefficients, reduced molecular weight sigma and the wavelength of the scan.

Global parameters include the molecular weight for each species, the partial specific volume of each species, the second virial coefficient for each species, and the association constants for the model, if any. You can float either the molecular weight or the partial specific volume (vbar) of the particle, but not both at the same time. To set the parameters for any given species in a multicomponent model, click on the "Global Run Parameters for Component:" counter. To set the partial specific volume for each parameter, either enter the value corrected for 20oC into the dialog, or click on the "Vbar, 20oC" button. This will call up the vbar calculation module.
Association constants can be displayed in one of three ways. The default measure of displaying the association constants is as the log of the association constant in absorption units. If an extinction coefficient different from unity has been entered (see below for details), the association constant can also be displayed in concentration units, or as a dissociation constant. In order to change the display mode, simply click on the association constant of interest:


Only the setting for the log of the association constant in absorbance units is used for the fit, however, since a log of the value naturally constraines the amplitude to be positive. Negative values for the amplitude are physically nonsensical. Depending on the model and stoichiometry chosen, the units will be changed as well. Another effect of entering a molar extinction coefficient is that you can display concentration histograms in molar units. If the scans included in the fit were measured at different wavelengths, the program allows you to select concentration (molar) units or optical density measurements.

Other static parameters include the extinction coefficient, the buffer density, the cell's pathlength and the reduced molecular weight sigma.
Before proceeding to the next section, you should now manually review all scans to determine if they are properly included or excluded from the fit. You can control the inclusion of scans in the fit by selecting specific scans with the "Scan Selector:" counter and checking the "Include this Scan in the Fit" checkbox:

If you double-click on scans listed in the scan
listbox, you can also toggle if a scan is included or excluded
from the global fit. If a scan has been automatically excluded by the
"Scan Diagnostics" function, you can override this setting now.
Scans overridden in such way will be marked with a red triangle ( ) in the listbox. Check to
see if excluded scans suffer from peripheral noise. In such a case you may
be able to include the scan after cropping noisy sections from the scan.
IMPORTANT NOTE: For best results, always re-initialize all parameters before proceeding to the fitting session by clicking on the "Initialize Parameters" button when additional scans are excluded or included. The parameters will need to be re-initialized before fitting, or unexpected results can occur. This is not necessary if the default selection of scans is used.
| Previous: Scan Editing | Parameter Controls | Next: Fitting Information |
This document is part of the UltraScan Software Documentation
distribution.
Copyright © notice.
The latest version of this document can always be found at:
Last modified on January 12, 2003.